Showing posts with label Chevy Volt Lithium Batteries. Show all posts

Monday, January 15, 2018

Lithium Battery Update and Magnum Magna Hybrid Sine Inverter / Charger


Hi Folks,


It has almost been a year since my last update.  I stare at a computer all day at work, so I can go weeks before I even turn on my Home PC.  As a results, this poor blog hasn't been updated, since I have other things I want to do.  


I started freeze drying back in September 2017 (kind of a hobby), so I would start eating more fruits and vegetables instead of other things for snacks.  It takes a fair amount of work to keep it going, but I hope to have a bunch of food freeze dried before we hit the road.  The nice thing about making freeze dried food, is it doesn't require refrigeration (can be stored for 25 years), is light weight (10 lbs of potatoes weighs only 14 ounces freeze dried), and it retains 97% of the nutrition.  Maybe someday I will do a blog on that. 

At any rate I retire in December of 2018 and we plan to hit the road until we get tired of it.  So maybe I will do a better job keeping up on my blog then.


Chevy Volt Lithium Batteries Reconfigured


This was done in February 2017.  After one year of use, several things were learned.  First, the batteries never really got hot from use or charging,  so liquid cooling is not needed for this type of application, but heaters are needed when RV sits in the cold in storage.  This is why I used a star configuration in the first place, was to allow for liquid cooling.  This configuration is not best keeping the four batteries balanced or maximizing space.  


Old Battery Box (Star configuration).


New Battery Box.  I added 1/2 foam insulation on inside.


Batteries are now lined up in parallel.  Each battery has a battery balancer which keeps all the cells at the same level (very import with Lithium batteries).

The second item I learned is the BMS hooked up to the battery port didn't truly keep all cells balanced.  I found the first cell in the first group to be way out of balance after one year of use.


The batteries were converted from 48 volts to 12 volts, so each battery has four 12 volt (of 3 cells each) inside each battery.  Here I am balancing the first of four batteries (inside the physical battery).  Only the first one was way out of balance.  BTW, this is the hobby battery balancer I have used for last two years and works great.  The nice thing about this battery balancer is it keeps monitoring and balancing after the cells are balanced.  Most hobby balancers marketed today quit balancing when cells are balanced.  The blue balancer in the previous picture to this one is that type, and is hooked up to the Boostcaps.  I can't use the black one above, because the cell voltage of the Boostcaps are too low.

So once all the batteries were re-balanced, I connected all same voltage cells together, and wired my battery balancer directly to the battery.  Here the before and after modifications.

Here is the 48 volt battery as converted to 12 volts by eBay seller.  Basically they cut the series plates after every three cells and then connect the four pluses and four minuses together in parallel.  The cells at 4 volts and 8 volts are not connected together.


I connected all the 4 volts and 8 volts cells together, and then I wired my battery balancers directly to the cells, which are now wired in parallel at the cell level.  After a year, I have had no more problems with one battery cell within the battery getting out of balance.
The third thing I learned in the first year was that it was easier to buy Arduino UNO Shields and sensors than to build my own custom circuits.  Also I don't need to worry about cell level monitoring, since the battery balancer will keep all the cells balanced.  This made the Arduino much simpler, as well as the programming simpler.  The Arduino now monitors battery voltage, boostcaps voltage, and temperature.  I also went to a solid state battery relay which connects or disconnects the battery as need.  Using a relay shield, I have four relays to control devices on and off.  Currently I use 3 of the 4, (1) battery connect relay, (2) fan control, and (3) heater control.


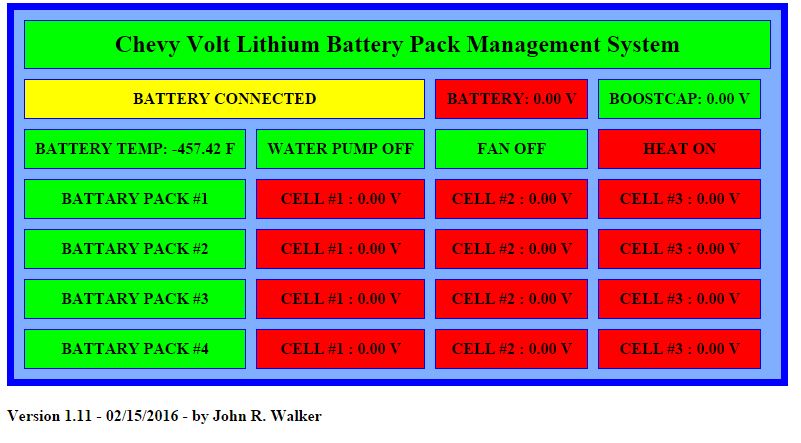
New Battery Monitor System (BMS).  Much simpler, using a Arduino UNO (bottom), Relay Shield (next up), Ethernet Shield (above Relay Shield), and finally Custom Circuit Board (on top).  There are also two voltage sensors attached to top custom circuit board.  These are used for monitoring battery and boostcap voltages.
Another view of the four boards.


I added some buttons on to fine tune battery, boostcaps, and temperature, because when the PC is connected to Arduino it effects the accuracy of the measurements.


The new web page also includes raw data, so you can see what adjustments need to be done with the buttons on top of the custom circuit board.
The last change for the batteries was upgrading the battery cables from #2/O AWG to #4/O AWG to handle the 3000 Watt Hybrid Sine Inverter.

This winter we have been in the single digits and did not get above freezing for a week.  The RV sits in a storage lot right now, but I have alarm system, with a temperature sensor in the battery box so I can monitor the battery box temperature remotely.  The BMS turns the heater on at 38 degrees, and I have not seen it go below that, even with outside temp in the single digits.  If the box temperature gets to 32 degrees, the alarm system will text me, and notify the alarm center who will also call me.  This happened a couple of time last year, before I hooked up the heaters.  The heaters have been using about 16 AH overnight with current temps in the low teens.


Magnum Magna Hybrid Sine Inverter / Charger


Also done in February 2017, this was a big upgrade over the Xantrex PROWatt 2000 Inverter, which really didn't like running at the lower voltage of my lithium batteries, and could not handle high startup current of things like the vacuum cleaner.  

The Magna also has a charger function which I have tested on a 100 foot 14 GA extension cord and a standard 110 Volt 15 amp circuit.  Lithium batteries will take all the amps it can get while charging, and this will blow blow a 15 amp circuit in just a few seconds using the factory converter charger.  My factory converter will pull 34 amps, which will many times blow a 30 amp RV service when batteries are below target voltage. The Magna will let me set shore power to 12 amps, and will charge the batteries without blowing the 15 amp house breaker, since it will never pull any more that 12 amps from shore power regardless of load.


Before the Magna Inverter, I was only able to charge my batteries with solar when hooked up to 30 amp service, since the factory converter will pull 34 amps to change the batteries.


The other big advantage of hybrid inverters is to supplement shore power (or generator) using the batteries.  Example: if connected to someone's house, you can set the Magna to use 12 amps.  If you turn on the A/C or microwave, the Magna will make up the difference using the batteries.


Once the load drops back down, the Magna will then use the excess of the 12 amps to recharge the batteries, but at no time will it draw more than the 12 amps I set for it to take for shore power (or generator).   Since many places still only have 30 amp service, you can set the Magna to take 30 amps from shore, and can boost that to 60 amps (using the batteries).  When the load drops to less than 30 amps, the Magna will use those extra amps to recharge the batteries.


I also installed
 Micro-Air Easy Start With the Easy Start you can run the A/C on one Honda 2000, or just off the Magna Inverter itself. With the Magna Hybrid Inverter set to take 14 amps from the generator, I am able to run the A/C and the microwave at the same time. 


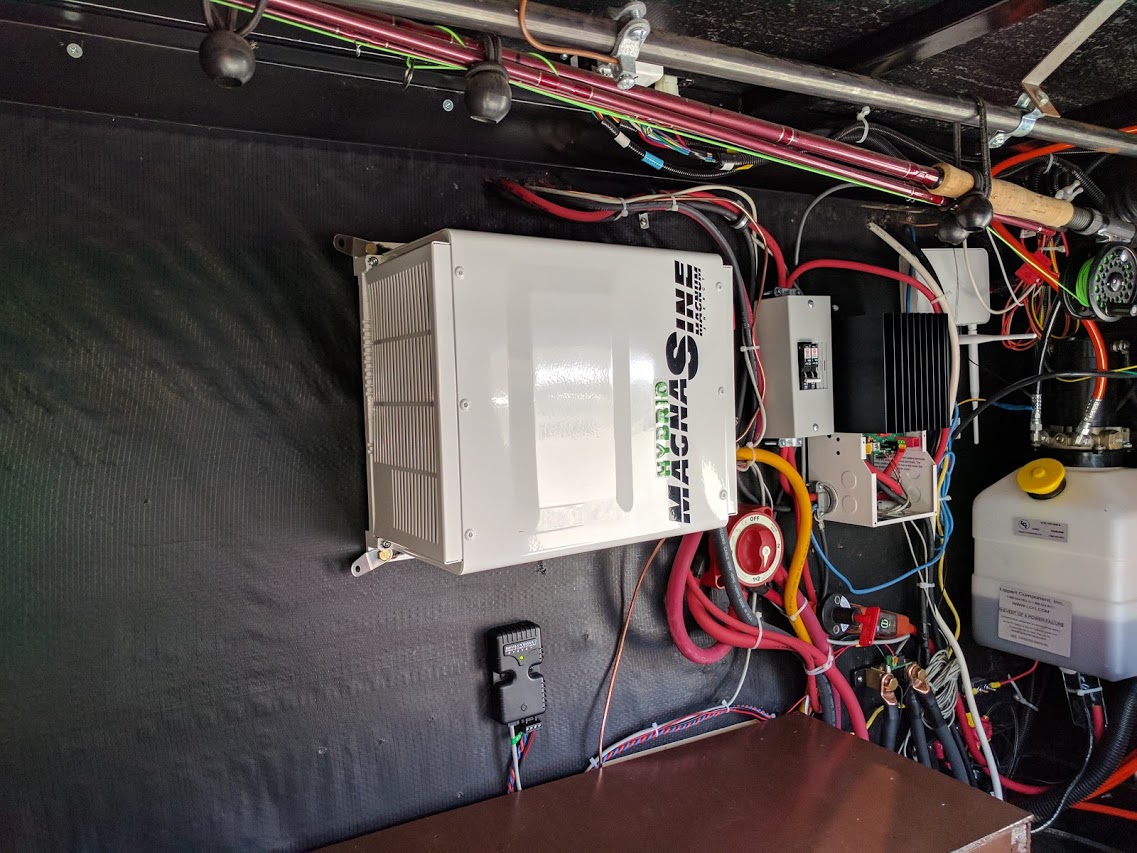
Magnum Magna Hybrid Sine Inverter / Charger.  It can take up to 30 amps shore (or generator) power and boost it 60 amps.  Just keep in mind, if pulling 30 amps from the batteries, will be around 300+ amps being drawn from the batteries.  That will drain your batteries pretty quick.  When load reduces below the 30 amps, the Magna will start recharging your batteries with the excess power from shore power.


This is the remote control unit for all of Magnum's products.  This is where you also set how much power to pull from shore power or generator.  I am also looking at replacing my Morning Star TRI-STAR MPPT 60 with Magnum PT-100 MPPT Solar Controller since it can handle 100 amps output.  The PT-100 will also use the same remote control unit I already have.  This will allow me to use my four panel in summer time.  Currently the three panels on the roof can produce more than 60 Amps, and the Morning Star will throttle the panels so output doesn't exceed the 60 amps the controller is designed for.

There are many other modifications I've done, and trips we have taken, I will try to put something together on those in the next day.


Spring projects for this year, are to replace the theater seating with higher quality seats, and upgrading the solar control Magnum PT-100 MPPT Solar Control.  


Not sure I can find space on the roof to mount the forth panel, so I will probably keep it as a standalone panel can place on the ground to catch morning and evening sun.  Also gives me options when camped under trees.


Monday, March 21, 2016

Chevy Volt Lithium Battery Project

So far I am very pleased with the Chevy Volt Lithium Project.  The batteries have been in the 2015 Montana 3611RL for a little over two weeks in the storage lot.  This is off grid location, and only changing is completed via Solar Panels.  We had cold cloudy day yesterday, so solar output was only 70.8 AH for the entire day.  Since I have AC Inverter on 7/24, and the Satellite receiver on all the time, the daily load is around 184 to 190 AH per day.  So we started today (full Sun day), already 120 AH in the hole from previous day plus the AH used over night.

Today's output was 241 AH, and Solar Controller was in Absorption for 276 minutes, but that just means the Lithium Batteries fully charge and didn't need any more power for 4.6 hours of the daylight hours today.   Once the batteries reach 12.06 vols, the batteries are disconnect from the RV and the power is provided by Bootscaps and Solar Panels while the Sun is shinning.

Now lets get to the fun stuff (pictures), btw the previous blog post had more information on my project.
Battery Box Top View 21" W x 24" L x 15" H

Battery Box Bottom View


Old Battery Installation - Six 6V Trojan 105


Old Batteries Removed


Chevy Volt Batteries have liquid cooling

When it get to hot I can open the compartment door

Another look at plumbing
I had a minor set back here.  The electric water pump is DOA, so now I need to drain the system and put another pump in there.  I have a few months before temperatures get above 90 degrees.  The heater is working fine, and we are going to be near freezing tonight.


All those wires on top are the Battery Management System (BMS) that I created.  See previous post for more info
 
Battery Box with lid on.  No venting required, no maintenance either.
Because to the Chevy Volt batteries are Lithium Ion, the cell voltages are different from most common Lithium batteries used in RV's today (LifePO4), there are three cells to make 12V, where LifePO4 use four cells.  It is very important that the Lithium batteries not be over charged or discard.

My target voltage per cell is 4.02 volts per cell.  So when my battery pack is 12.06 Volts, it is fully charge.  The 4.02 volts per cell is really the 80% level.  Charging to 90% is around 4.1 volts per cell, and 100% is around 4.2 volts per cell. 

The batteries will last a lot longer, at 80%.  The batteries are expected to last 15-20 years when charged to 80%.  If you charge to 90% 4.1 volts per cell, the life drops to 7-8 years, and at 100% 4.2 volts per cell, life drops to 4-5 years.


Had Residential Fridge and Satellite Receiver running for 24 hours.

Used 184 Amp Hours over night.
Battery Voltage Dropped from 12.06 Volts to 11.48 Volts


After running Fridge for 36 hours I turned it off.  Panels are facing East and West, not getting 100% of rated power, but was still able to harvest 340.9 Amp Hours on one day when the Fridge was running.

More picture can be found at Lithium Battery Project


Sunday, February 21, 2016

Chevy Volt Lithium Battery Packs For My Montana RV


Chevy Volt Lithium Battery Packs Converted to 12 Volts.  What you see is my 800 Amp Hours battery pack, with a weight of 188 lbs.  This will replace my Six Trojan T-105 (675 Amp Hours) with a  weight of 384 lbs.
Hi Folks,


My six Trojan T-105 Golf Cart Batteries are are six years old, and running out of gas.  I wanted to replace them with Lithium Batteries, but they are not cheap.  Reading up on Lithium Batteries, I found the three things will greatly reduce the lifespan of Lithium batteries.  1) Letting the batteries discharge to far, 2) over charging them, and 3) letting them get to hot.

I picked up four Chevy Volt Lithium Battery Packs converted to 12 Volts each rated at 200 AH.  The batteries have liquid cooling, which I plan to use.  The batteries also have a temperature sensor, so I will be able to monitor the battery temperature.  There really isn't any off the self Battery Management Systems (BMS) that will work with Chevy Volts batteries outside being in a Chevy Volt.  The little I could find out was that very max cell voltage is 4.2 volts per cell; however, if you charge them that high, you will shorten the lifespan to less than 4-5 years.  Charging the batteries to 4.02 volts per cell, the batteries will last 15-20 years.  Charge them to 4.1 volts per cell, and the lifespan drops to 7-8 years.

I haven't found any data on max temperature, but some folks say keep them under 90 degrees.  I plan to keep my battery cell voltage between 3.3 Volts and 4.01 Volts, which I can adjust in the program, once I get some real world use.

Speaking of program, my BMS is home grown, using Arduino Mega microprocessor.


Arduino Mega Microprocessor 256 KB Memory 16 Analog Inputs and 54 Digital Input/Output Pins

I added off the self Ethernet board that plugs right into the Arduino, and I added two prototype boards with my circuits to measure cell voltage, battery temperature, total battery voltage and Boostcaps voltage.


In case you wonder what a Boostcap is, here you go, I will explain later why you need them.


Top and side view of my BMS.  Four ribbon cables will attach to the two prototype circuit boards.  I still need to wire the fan and pump control pieces.  I will use two MOSFIT so I can control the speed of the fan and pump.

Here is the side view of my four Chevy Volt battery packs.  Two packs are connected together to make two 400 AH battery packs.
Battery Management connections.  One for each pack.


This is my development work in progress.  The very top you will see the Boostcaps (six in series).  The front center you will see the battery relay.  To the right of the battery is my BMS, and to the right of that is hobby battery monitor, balancer, and discharged.


Here is two packs connected to the BMS.


Here is the Battery Management System web page I programmed for the two battery packs above.  


Here is the completed BMS web page, with batteries not connected.

OK, so the why do we need the Boostcaps?  There two reasons, the solar controller isn't really made for Lithium batteries, and neither is the Montana's converter (converts 120 volts AC to 13.5 Volts DC).  Lithium battery will charge a very high rate, but when they reach the charge voltage, you need to stop charging them.  The most common RV batteries are Lead Acid, AMG, and Gel batteries, which you have to hold a high voltage of charge for 3 hours to fully charge them. These type of batteries require 15% more power put into them, than you get back out.  Also only 50% of AH capacity can be used.  The number of cycles is around 500.

With Lithium batteries, you get the same amount of power out as you put back in.  Lithium batteries can safely use 80% of AH capacity, and number of cycles is 3,000 to 4,000.  If not pushed beyond the 4.02 volts per cell, battery temperature maintained, the batteries could last 15-20 years.

The drawback to Lithium batteries, is you must have special charging systems that manages the charging, discharging of the batteries, and keeps the cells balanced.

So now we come to the Boostcaps, to trick the dummy charger into thinking it is charging a Lead Acid battery.  The Boostcaps are very low voltage (2.7V) so putting six in series the can handle 16.2 volts with millions of cycles.  I don't know how many Amp Hours are in the Boostcaps, but the can deliver 1,000 Amps for short period of time, and recharge in seconds when connected to a battery.   

Since the solar controller can be damaged if disconnected from the batteries while the solar array is making power, the Boostcaps provide a battery like equivalent, and everyone is happy.

Now we need a way to connect the batteries to the Boostcaps when the batteries need charging, and to disconnect when fully charged.  And if the Boostcaps voltage drops below the battery voltage (meaning no more solar power or load is greater than solar output), we need to connect the batteries to recharge the Boostcaps.  We also need to make sure no battery cells drop below the set value in the BMS parameters.


Battery relay is controlled by the Arduino program, which monitors all the batteries cells, battery voltage, and Boostcap voltage.  The program will then decide weather the relay should be closed or not.


Here is the Arduino, with my two prototype boards and the battery balancer.  When all four packs are hooked up there will be four battery balancers plug into the two prototype boards.

Although I have already prototype'd the Fan, Pump, and Heater controls, I need to put those circuits my finished prototype boards.

I also need to build a insulated battery box to keep batteries warm.  After that I will need to plumb the cooling lines, pump, and radiator to keep then cool.


A couple folks have asked how the batteries were converted to 12 Volts.  I bought them already converted, but basically the cell connection plates are cut into sets of three cells in series.  Then the four sets are wire together in parallel.


Battery heat, pump and fan circuit.


Here I have just the Boostcaps connected so I and test the new circuits I built tonight (2-23-2016).  Also test low and high voltage disconnects.  The light will be my heat source.


Here you can see the three MOSFITS that control the Heat (three light bulbs), water pump, and fan on the radiator.


This is my electric water pump from a Priest. 


I got a small radiator with electric fan.

More to come....